What i also like is that the end product can be interpreted in so many different ways. It can be a flower, snowflake (spring/winter themed art), a star, a windmill or a 3D butterfly (just add antennas at the top with pipe cleaners.
My daughter even said if we create an all pink one and put a circle on top with a face, it could be a ballerina wearing a tutu and dancing on her tippy toes. Love the imagination of a 3 year old (yes, i see it now!)
So lets get started...
Materials:
-construction paper
-tape or stapler. If you are doing this with kids pre cutting the tape in smaller pieces is most likely the best option. I would recommend against using glue.
-scissors.
Instructions:
1. Using construction paper draw six 6 inch X 6 inch squares.
Simple 6's. 6 squares that are 6X6 in measurement
2. Cut those squares out.
3. How to create two smaller squares within the big square:
- To do this, you need to fold the opposite diagonal corners together to form a triangle (you can see the fold in the picture below)
-cut two diagonal lines on each side forming a smaller triangle (but do not cut the triangle right out...just two lines forming a triangle that don't connect). Do this again to create the smallest triangle, so that you end up with three triangles that don't connect. Open up your folded triangle.
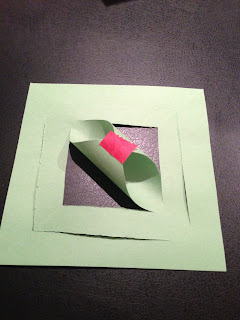
Now you have 2 smaller squares inside your original 6X6 square.
4. Take each diaganol opposite corner that have been cut on the smallest square and tape them together. Flip the whole square over and do the same for the next inside square (tape the corners together). Flip the square over again and tape the corners of the orginal square together.
Do this process for all 6 squares.
 |
| bring diagonal corners together |
 |
| secure with tape |
 |
| Flip the whole square over. See how you can't see the red tape in the previous picture. |
 |
| Bring the corners together |
 |
| Secure with tape. Flip it over one last time to do the same for the oirginal square. |
 |
| Bring the last corners together and secure with tape. Now 1 is complete. Repeat steps for all 6 |
.JPG) |
| all 6 complete. |
5. Take 3 of them and tape them together at the bottom points. Take the other three and tape them together at the bottom point too. Now tape these sets together (bottom point to bottom point).
.JPG) |
| 3 taped together from the bottom point. Tape other set of three together. You will then attach the trio's together. |
 |
| Attach them together at the bottom |
.JPG) |
| All 6 stuck together |
6. To secure them further you tape them together at the sides....use your tape as an indicator on where to secure again.
\
Presto in 6 easy steps you have your own flower, snowflake...whatever your kids want it to be.
Tips:
I used coloured tape just for the tutorial. Clear tape works well. Glue is also an option for older kids. Make sure to remind them to hold them for a bit to make sure the glue will secure.
It does become frustrating though if it becomes unglued while in the process, so i find tape works the best. Stapler works as well.
You can also use regular white paper or newspaper.
You can make them in one colour or make a whole bunch of squares in different colours. My daughter liked the multi coloured ones.
how cute would they look with stems at the base of your walls...your own little class garden. Or hanging from the ceiling.
\


.JPG)
.JPG)
So cute (but too advanced my girls just yet)!
ReplyDeleteTrue. I will be posting more, so lookout for some fun simple crafts. I find that when they are young you just let them explore art in their own ways. Crafts are boring for them. I still limit the number of planned crafts with my daughter. It's amazing what they create when they are not limited with doing a certain craft. I usually just put a basket out with different papers, craft supplies, paint, scissors and glue and let her do her thing. I love the saying "There is no must in art, because art is free."
ReplyDelete